


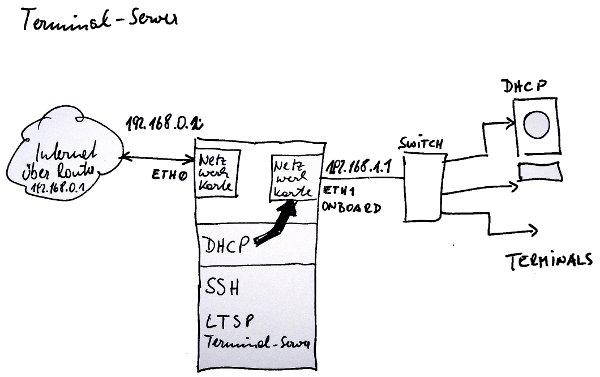
Ubuntu Terminal Server
-
Ubuntu 9.04 installieren
auf der Alternate CD ist kein Terminalserver mehr enthalten, daher normale Installation und nachträglich den Terminalserver montieren -
http://unixlab.blogspot.com/2009/08/how-to-install-ltsp-on-ubuntu-904.html
Anmerkungen:
Statische IP – Adressen in /etc/network/interfaces eintragen; dann das Netzwerk neu starten:
$ sudo /etc/init.d/networking restart
Mit ifconfig prüfen, ob beide Netzwerkkarten aktiv sind und eine IP-Adresse haben.
auto lo
iface lo inet loopback
# Zusatzkarte
auto eth0
iface eth0 inet static
address 192.168.0.222
netmask 255.255.255.0
gateway 192.168.0.1
dns-nameservers 192.168.0.1
# OnBoard Karte
auto eth1
iface eth1 inet static
address 192.168.1.1
netmask 255.255.255.0
gateway 192.168.0.1
dns-nameservers 192.168.0.1
Namensauflösung über /etc/resolv.conf
nameserver 192.168.0.1
Dhcp Server einrichten und neu starten
sudo /etc/init.d/dhcp3-server restart
/etc/ltsp/dhcpd.conf
#
# Default LTSP dhcpd.conf config file.
#
authoritative;
subnet 192.168.1.0 netmask 255.255.255.0 {
range 192.168.1.20 192.168.1.250;
option domain-name "example.com";
option domain-name-servers 192.168.1.1;
option broadcast-address 192.168.1.255;
option routers 192.168.1.1;
option subnet-mask 255.255.255.0;
option root-path "/opt/ltsp/i386";
if substring( option vendor-class-identifier, 0, 9 ) = "PXEClient" {
filename "/ltsp/i386/pxelinux.0";
} else {
filename "/ltsp/i386/nbi.img";
}
}
Den DHCP-Server an Interface eth1 binden:
$ sudo gedit /etc/default/dhcp3-server
# On what interfaces should the DHCP server (dhcpd) serve DHCP requests?
# Separate multiple interfaces with spaces, e.g. "eth0 eth1".
INTERFACES="eth1"
1) Install Ubuntu 9.04 desktop
You can follow the default documentation on Ubuntu site.
2) Set up a static IP on the system
You can refer to this post for setting up static IP on Jaunty.
3) Install dhcp3 server
$ sudo apt-get install dhcp3-server
You may also refer to this post for some more details on dhcp3 installation on Ubuntu 9.04.
4) Install open ssh server
$ sudo apt-get install open-sshserver
Ltsp uses ssh to tunnel X to the client machines.
5) Install ltsp
$ sudo apt-get install ltsp-server-standalone
This will download all the package needed for building LTSP.
6) Edit /etc/ltsp/dhcpd.conf to suit your IP requirement
The default dhcp3-server configuration file is in /etc/dhcp3/dhcpd.conf. However when ltsp was installed it created a new config file for dhcp3 under /etc/ltsp/dhcp3.conf. You have to edit this dhcp3.conf to suit your IP requirements.
My dhcpd.conf looks like this. You can use this as a starting point.
Code:
# Default LTSP dhcpd.conf config file.
#
authoritative;
subnet 192.168.0.0 netmask 255.255.255.0 {
range 192.168.0.20 192.168.0.250;
option domain-name "example.com";
option domain-name-servers 192.168.0.1;
option broadcast-address 192.168.0.255;
option routers 192.168.0.1;
# next-server 192.168.0.1;
# get-lease-hostnames true;
option subnet-mask 255.255.255.0;
option root-path "/opt/ltsp/i386";
if substring( option vendor-class-identifier, 0, 9 ) = "PXEClient" {
filename "/ltsp/i386/pxelinux.0";
} else {
filename "/ltsp/i386/nbi.img";
}
}
7) Run LTSP build client
$ sudo ltsp-build-client
This command will build the ltsp environment under /opt/ltsp and build the squashfs image for clients.
8) Enable pxe boot on a client machine and test the set-up.
Trouble shooting
1) If your client boots up and says "You are not authorised to connect to server" , run the following.
$sudo ltsp-update-sshkeys
$sudo ltsp-update-image
2) If you change the IP address of the server, run the same commands again, ie
$sudo ltsp-update-sshkeys
$sudo ltsp-update-image
Posted by Fermi Level at 9:35 PM 